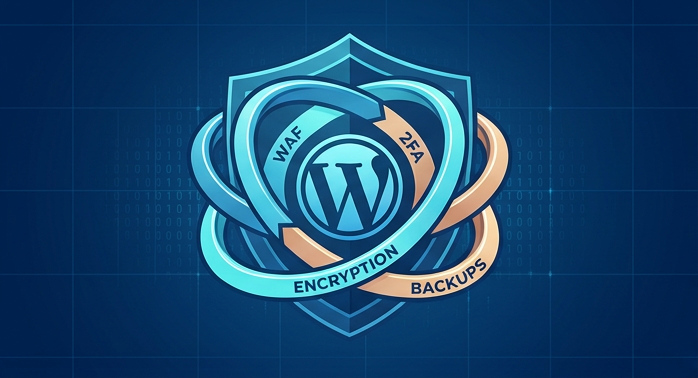
How to Secure a WordPress Site in 2026
When your business website goes offline or starts redirecting visitors to untrusted platforms, the impact are immediate. Learning how to secure a WordPress site in 2026 is no longer an optional task you can delegate to a generic support ticket once a year. Modern, automated botnets scan millions of web addresses every hour. They look specifically for known vulnerabilities in central scripts, system files, databases, and administrative gateways.
Protecting your web asset does not require you to be a terminal-bound systems engineer. The vast majority of successful cyber attacks do not use incredibly complex, custom-coded exploits. Instead, they succeed because of basic configuration errors, old software components, weak password habits, and misconfigured database rules. This guide provides a practical, direct roadmap for UK business owners, technical leads, and marketing managers who need to protect their digital real estate in 2026.
Why Website Security Matters
A security breach directly threatens your revenue to your revenue and search engine standing. When an attacker gets into your server, they rarely make a grand announcement. Instead, they inject quiet, hard-to-detect malware scripts that only run when a visitor arrives from a search engine result page. For instance, These scripts can show spam adverts, harvest search traffic, or redirect users to malicious landing pages. Doing so completely destroys the indexing equity you spent years building.
For companies operating in the United Kingdom, database breaches trigger heavy legal and financial fines. Under the strict rules of the UK GDPR and the Data Protection Act, businesses have a legal duty to protect all user records and sensitive client information. If the ICO finds that a company failed to protect data to implement industry-standard server defenses, the ICO website has the direct power to investigate, issue public alerts, and apply significant financial penalties based on global annual turnover.
Beyond the legal risks, the technical recovery process is incredibly expensive. Fixing a hacked website requires pulling in emergency forensic developers to scan databases, clean code systems, and submit audit requests to search engine groups to get your site off malicious blacklists.Allocating a budget to secure a WordPress site proactively is vastly more efficient than paying for emergency post-hack repairs, keeping your platform clean, fast, and trusted by your target audience.
How to Secure a WordPress Site: Choosing the Right Host
Your journey to secure a WordPress site starts with your hosting infrastructure. Cheap, unmonitored shared servers expose your files to massive risks. Hundreds of random websites end up sharing the same system assets. A single hacked site on a shared server lets attackers execute local script adjustments. Consequently, they can step across directory boundaries to access your files.
To prevent this exploit path, move your site to a WordPress-engineered virtual private server or an isolated cloud hosting container. Modern hosting setups use container isolation to host each website in its own secure space, making lateral transitions across sites impossible.
Upgrading to Modern PHP and HTTPS Protocols
Elite hosting networks also run active server-level firewalls, monitor incoming connection speeds for malicious spikes, and provide global protection against distributed denial-of-service attempts.
Your hosting runtime environment must also match current software standards to maintain top performance and security. our server should run on PHP 8.4. This is the fully patched, active core language supported by the development community. Running legacy versions of PHP exposes your system to unpatched engine errors that attackers can exploit to bypass local locks. You can verify your active PHP version directly within your hosting control panel or through the native Site Health manager in your WordPress admin room.
Finally, your hosting engine must enforce encrypted web connections. Secure a validated TLS/SSL certificate for your primary domain and enforce server-level redirection rules that automatically point all plaintext HTTP connection requests to the encrypted HTTPS protocol. This ensures that every byte of information shifting between your visitors’ browsers and your server database remains encrypted.
Device-Level Security
Compromised local hardware causes a significant percentage of website hacks. If a team member logs in using an unsecure laptop, your website is in danger. Furthermore, local malware can easily log keystrokes, hijack session cookies, or steal saved browser passwords.
To stop these local threats, force your management team to use updated operating systems and run live endpoint security scanners. In addition, you must ban password reuse across different digital platforms. If a user uses the same password for their WordPress account as they do for a compromised third-party service, automatic credential-stuffing software will eventually unlock your admin dashboard.
Mandate the use of enterprise-grade password managers to generate, store, and automatically log into secure zones. hese tools generate long, complex credentials that dictionary attack systems cannot guess, complex, and impossible for dictionary attack systems to guess.
Securing a WordPress Site: Access and Login Best Practices
The administrative login screen of your website is a constant target for automated brute-force scripts. Securing this interface requires a multi-layered authentication strategy.
Begin by auditing all existing user accounts to eliminate legacy usernames and elevate credential standards. You must completely eliminate the default “admin” profile name, as automated dictionary scripts will target this handle first.
When configuring team profiles, strictly enforce the principle of least privilege. This rule dictates that users should only receive minimum permissions to perform their daily duties. A copywriter requires nothing more than an Author or Editor profile, while a marketing manager can typically operate with Editor access. Only technical leads who manage core updates and direct configuration settings should hold Administrator roles. This structure ensures that if a general staff account is compromised, the attacker’s system access is heavily restricted.
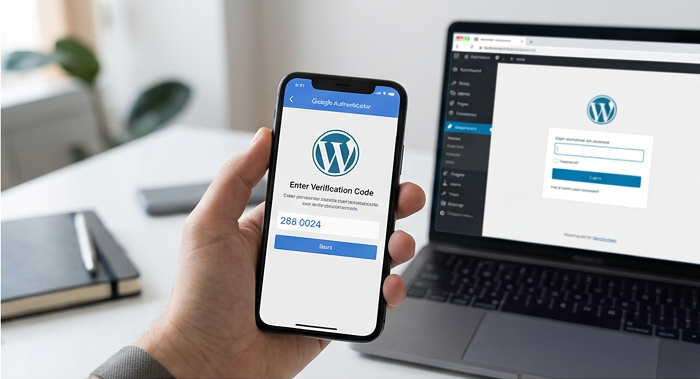
Implementing multi-factor authentication is one of the fastest ways to secure a WordPress site against credential stuffing. You must mandate a two-factor validation step for every account with administrative, editing, or publishing access. This protocol forces users to provide a temporary verification code from an authenticator app. This single step instantly neutralizes the threat of compromised passwords. An attacker simply cannot log in without holding the physical device.
Brute-Force Defense: Lockouts and XML-RPC Disabled
Next, implement automatic lockout controls to isolate persistent brute-force attacks. As a result, you should configure your security system to block any IP address that generates more than five failed login attempts in a ten-minute window.
For additional isolation, you can change your default login pathway from the standard subdirectory path to a customized, secret URL endpoint. This clean translation instantly evades standard login crawling scripts.
Finally, you should completely disable the legacy XML-RPC interface of your site. This system protocol was originally designed to allow external applications to communicate with the WordPress platform, but today it is frequently hijacked to execute rapid, high-density brute-force attempts without triggering standard application lockout thresholds. You can disable this system via local host-level security configurations or your site’s firewall.
Integrating Web Application Firewalls and Monitoring Agents
A Web Application Firewall (WAF) acts as your primary network shield. By monitoring every incoming connection, a firewall detects and blocks malicious system requests, SQL injection payloads, and cross-site scripting inputs before they ever reach your WordPress container. To dynamically secure a WordPress site from modern web exploits, a Web Application Firewall (WAF) acts as your primary network shield.
To build a reliable configuration, you should understand the two primary firewall architectures available on the market today:
DNS-Level Firewalls
DNS-level solutions reroute your domain’s incoming traffic through a secure global cloud network. Then, they safely forward clean traffic to your host server. The cloud network acts as an external shield, scrubbing and filtering all data at the edge of the internet. This setup works efficiently because the proxy neutralizes malicious requests completely off-site, reducing the computational load on your hosting hardware.
Application-Level Firewalls
These firewalls work inside your local site container as standard plugins or server integrations. While they lack the ability to block traffic before it hits your hardware, they provide deep visibility into your direct WordPress environment, letting you analyze local code changes and database activities.
The diagram below outlines the standard flow of incoming human and non-human traffic as it passes through a DNS proxy filter on its way to your WordPress container:
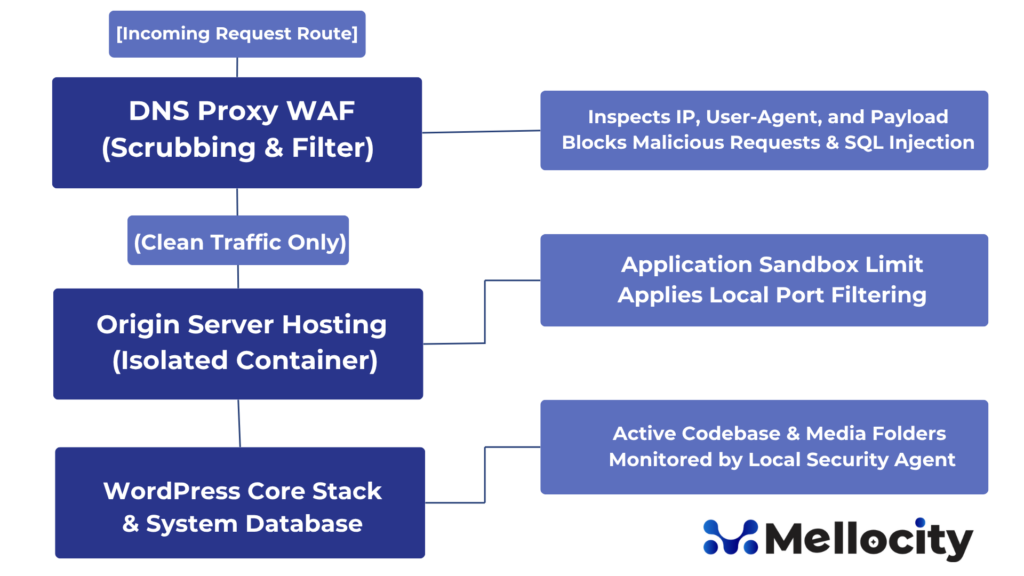
For professional business sites, the optimal approach is a hybrid defense model. Consequently, by combining a global DNS-level firewall with a local agent inside your WordPress dashboard, you create a deep, multi-layered defensive boundary.
Your active local security agent must be configured to run continuous file checking routines, monitor core activity logs, and run daily scans to match your active files against the official WordPress repository files. These comparisons instantly alert you if any core file has been edited, if unknown PHP files have been uploaded to your assets folder, or if foreign scripts are hidden within your themes. Configure these monitors to send immediate alerts to your technical team whenever a new administrative account is registered or when changes are made to central database tables, allowing you to react within minutes if a breach begins.
Hardening the Codebase, Filesystem and Database
To further secure a WordPress site, hardening your filesystem and database configurations is essential to block attackers from writing or executing malicious scripts within your database or directory layers.
On Linux-based hosting environments, you must strictly implement and maintain correct file permissions across your entire directory structure. Directory paths must always be set to a permission value of 755, which permits the web server to read, write, and execute contents inside the folder but blocks external writing tasks. Individual files must carry a permission rating of 644, ensuring they are readable by the server while blocking external write access.
Your critical configuration files, most notably your database access file, must be locked down even further to a strict permission profile of 600 or 400. This configuration blocks read and write access for all other system processes, allowing only the primary database owner to view its contents.
These file permissions are summarized across standard system directories in the table below:
| Directory/File Path | Required Numeric Value | Standard Permission String | Access Rights Profile |
| All Main Directories | 755 | drwxr-xr-x | Owner has read/write/execute; others have read/execute |
| Standard File Paths | 644 | -rw-r–r– | Owner has read/write; others have read-only access |
| wp-config.php | 600 or 400 | -rw——- or -r——– | Strictly isolated to database owner read-only rights |
Securing wp-config.php and Disabling the Code Editor
Securing your main configuration file is incredibly important because it contains your direct database access keys, password strings, and primary system salts. You can prevent web browsers from querying this file by moving it out of your directory root folder and placing it one directory level higher. If the file is placed outside your public web root, local server configurations will still read it perfectly, but external web queries will find it entirely unreachable.
Another highly recommended step is to turn off the administrative code editors within your WordPress dashboard. While being able to edit theme files or plugin scripts directly from the browser is convenient, it is a massive security vulnerability. If an attacker manages to compromise an administrative login, they can use these internal editors to paste and execute malicious PHP code directly on your server.
You can disable this native feature permanently by adding the following security snippet to your main configuration file:
// Disable the dashboard-level database and stylesheet editor
define( ‘DISALLOW_FILE_EDIT’, true );
Additionally, you should configure your server to prevent any PHP script running inside directory paths reserved for media files, such as your uploads folder. Attackers frequently use vulnerable upload forms to send malicious scripts disguised as image uploads, attempting to execute them by opening the file path directly in their browser. You can block this entire exploit vector by placing a custom configuration file in your uploads folder that blocks running of all script extensions.
Finally, you should change your database database table prefix from the default “wp_” prefix during your initial site installation. While this change does not stop targeted SQL injections on its own, it completely blocks simple, automated sweep attacks that scan databases looking for default table schemas to steal user credentials.
Advanced Protocols: Security Headers and Content Security Policies
To secure your WordPress platform beyond standard hosting filters, you must configure HTTP security headers on your server response loops. These security headers serve as strict rules that tell your visitors’ web browsers exactly how to handle and load your pages, protecting users from cross-site scripting, framing attacks, clickjacking, and mime-type exploits.
Ensure your server is configured to deliver the following core security headers with every response:
Strict-Transport-Security (HSTS)
This header tells your user’s browser that your site must only be opened using secure, encrypted HTTPS channels. It protects users from connection downgrade attempts and prevents transit sniffing on network connections.
X-Frame-Options
This setting prevents other websites from embedding your pages inside frame containers. It blocks clickjacking attempts, preventing attackers from laying invisible buttons over your registration fields.
X-Content-Type-Options
This directive forces browsers to strictly adhere to the mime-type definitions configured on your server, stopping browsers from sniffing files and running dangerous executables disguised as images.
Content-Security-Policy (CSP)
A highly detailed configuration rule that specifies exactly which domain addresses your page is allowed to load script resources, stylesheets, images, fonts, and frameworks from.
Here is an example format of highly secure HTTP transmission headers:
Strict-Transport-Security: max-age=31536000; includeSubDomains; preload
X-Frame-Options: SAMEORIGIN
X-Content-Type-Options: nosniff
Referrer-Policy: strict-origin-cross-origin
Implementing a strict Content Security Policy blocks cross-site scripting attacks. It serves as an incredibly effective safety net. What if an attacker injects a malicious tracking script? Your visitor’s browser will still refuse to run the code. This happens because your CSP rules do not explicitly whitelist the untrusted external domain.
You can configure and deliver these rules using your web server configuration file, through a DNS proxy dashboard, or via custom code headers in WordPress. Always test security policy updates in reporting-only modes before full deployment, as highly restrictive configurations can sometimes block legitimate third-party services.
Modern Software Supply Chain and Staging Management
While WordPress’s huge open-source theme and plugin ecosystem is one of its biggest advantages, it also represents its largest security vulnerability. Industry data shows that over ninety percent of all security breaches in the WordPress space are traced to vulnerabilities within third-party additions, rather than security failures inside the WordPress core software itself.
Specifically, every plugin or theme you add to your server increases your overall vulnerability surface. Before installing any new code library, establish a strict vetting routine. Check its volume of active installations and how recently the developer deployed updates. Finally, search community forums for outstanding security warnings. Vetting your third-party tools is a non-negotiable step to secure a WordPress site over the long term.
Protect your supply chain. Ensure you use this verification checklist before installing any new plugin or theme:
- [ ] Verified Repository Source: Is the code from a trusted, official repository?
- [ ] Active Maintenance Status: Has the developer deployed updates in the last 90 days?
- [ ] Broad Install Base: Does the plugin maintain at least 10,000 active installations?
- [ ] Clear Support Route: Does the developer offer a fast escalation route for reporting issues?
- [ ] Zero Nulled Code: Are you avoiding pirated or unauthorized versions of premium plugins?
You must completely avoid using “nulled” or cracked versions of premium plugins and themes.These pirated downloads frequently contain hidden backdoors and script injections. Consequently, they give attackers constant access to your server. Always source your plugins directly from the official WordPress repository or highly trusted commercial developers who offer support lines.
Safe Testing: Creating a Staging and Sandbox Workflow
Additionally, always use an isolated staging environment to test core updates and plugin additions before deploying them to your production site. The architectural pathway below outlines the flow of code adjustments, updates, and staging tests before modifications are pushed live:
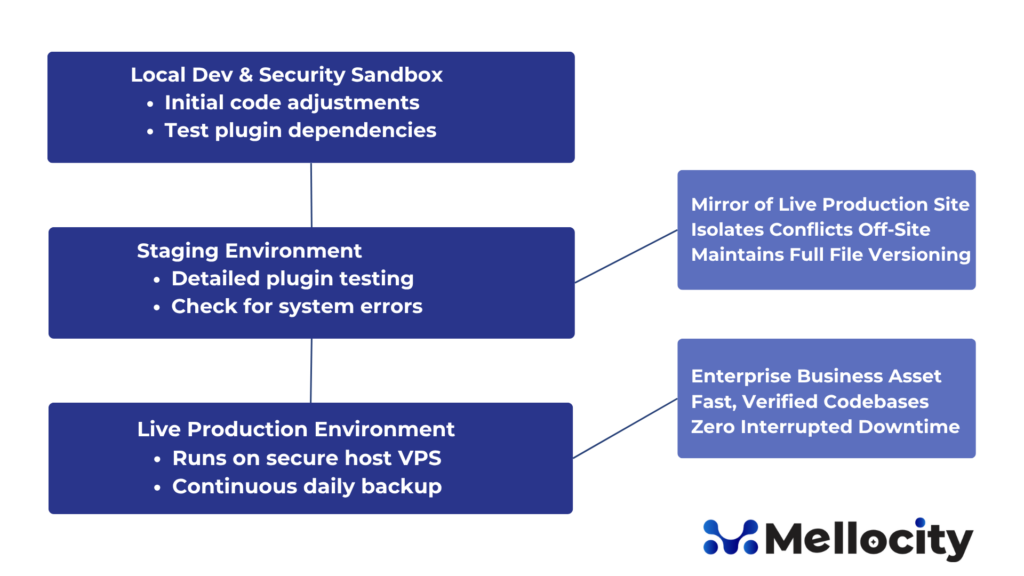
By testing updates in a staging environment, you completely eliminate the threat of unexpected server-side code conflicts, broken styles, or database connection losses on your live business platform. Testing edits in a sandbox let you evaluate security updates, confirm site stability, and verify full performance before executing your live deploy script.
The Ultimate Disaster Recovery Strategy: Bulletproof Backups
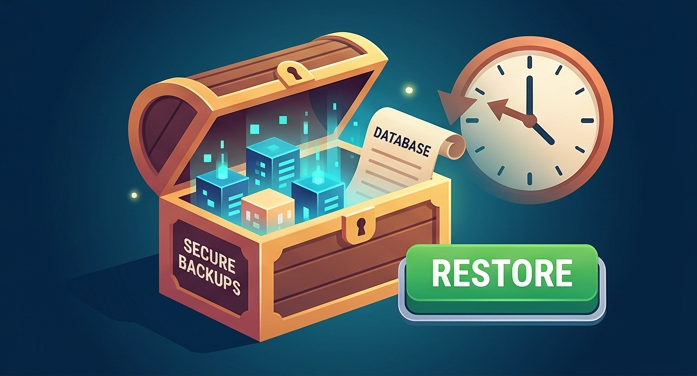
Even when you do everything right to secure a WordPress site, cannot guarantee absolute protection; you must have copies. If a zero-day exploit emerges or a host infrastructure breaks down, your ultimate safety net is a reliable database and file recovery process.
A comprehensive backup routine ensures you can restore your business operations within minutes, protecting you from ransomware demands, corrupted server drives, or code failures.
Your backup engine must capture your entire WordPress architecture. This includes your complete database records, all images and media assets, your active theme directories, and your plugin libraries.
Your backup archives must always be stored on an off-site, separate server network. You must never store backups on your main host server directory. If an attacker gains access to your host account, they will delete your local backups along with your active operational files, leaving you with no path to recovery.
Automate your backup systems to sync seamlessly with independent, secure storage locations. These include secure cloud endpoints, dedicated storage buckets, or highly secure local servers.
Use this operational matrix to establish and verify your backup schedule:
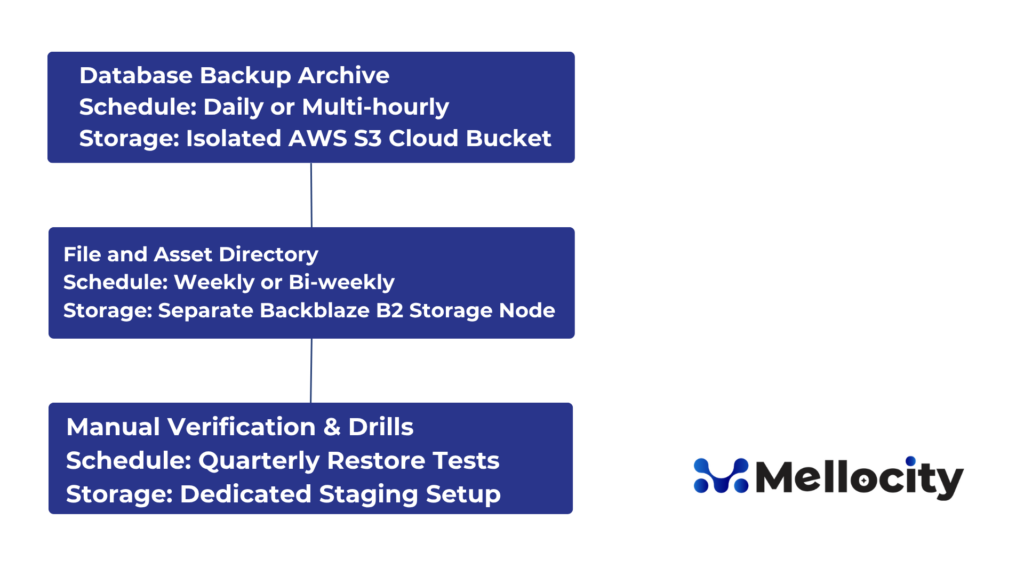
Configure your backup frequency to match how often your site content changes. A basic service-provider site with static content can run on weekly or daily update schedules. However, an active e-commerce store processing hundreds of customer orders every hour requires near real-time database synchronization to prevent transactional data loss in an emergency.
Finally, dedicate time to testing your restore processes. Periodically download one of your backup archives and deploy it in an empty staging container to verify your data is intact, confirm your database connects, and ensure your team is trained to handle a live disaster recovery situation.
The Response Protocol: What to Do Following a Site Compromise
If your WordPress site experiences a security breach, staying calm and following a structured incident response plan is essential. Your first priority is to place your website into maintenance mode or implement an absolute access block via your DNS firewall to isolate the breach. Knowing how to react is just as important as knowing how to secure a WordPress site in the first place.
Your containment and fixes should follow this quick-reference timeline:
1. Instant Isolation
Set a physical maintenance block, lock down all hosting control panel access, and block automated connections to prevent further data loss.
2. Diagnostic Investigation
Check your hosting logs, compare database changes, and run thorough malware scans to find files and tracking scripts.
3. Complete Remediation
Restore your platform from a verified off-site backup, update your plugins, and apply security patches.
4. Absolute Sanitization
Reset every password on your platform, rotate database access keys, generate new security salts, and verify user permissions.
Once the breach is contained, immediately change every active credential, including hosting accounts, database passwords, FTP keys, API strings, and administrative accounts. Next, run an exhaustive malware scan using your local security agent to find bad files, database edits, and hidden backend controls.
Compare your findings with your server log access files to identify the exact entry point the attacker used to compromise your site. This configuration step is highly critical. If you restore files without patching the leak, the attacker will exploit the same loop to bypass your systems again.
If you have a certified off-site backup created before the compromise occurred, restoring those clean files is often your fastest path to recovery. Therefore, once your site is restored, immediately apply all pending software updates, remove unused plugins, and harden your file permissions.
For high-traffic business websites, or if persistent security issues remain after recovery, look to a professional forensic cleaning service or your hosting team to clean up any remaining threats.
UK GDPR and Legislative Compliance
Operating a digital platform in the United Kingdom carries a strict legal duty to safeguard consumer privacy. The Information Commissioner’s Office (ICO) monitors compliance under the UK GDPR and has the authority to audit databases, issue public warnings, and impose heavy fines for technical negligence. Ultimately, the legal requirement to protect consumer data means you must actively secure a WordPress site to remain compliant.
A failure to protect customer databases can result in massive financial penalties, based on your annual business turnover. Under current guidelines, if a breach exposes user records, you are legally obligated to report the incident to the ICO within 72 hours of discovery. Affected users must also be notified without delay if the leaked data threatens their rights or security.
These UK statutory compliance standards are detailed in the data profile below:
| UK Compliance Standard File |
| ICO Maximum Penalty Policy: |
| -Up to £17.5M or 4% of annual global turnover |
| Reporting & Response Requirement: |
| – Strict 72-hour window from breach discovery |
| NCSC Cybersecurity Guideline: |
| -Patch critical vulnerabilities within 14 days |
To assist businesses, the National Cyber Security Centre (NCSC) manages the Cyber Essentials scheme. This program outlines the five technical controls necessary to secure operations against standard cyber threats. Cyber Essentials certification requires a strict update schedule. You must apply security updates within 14 days of release for all internet-facing software.
By aligning your WordPress update routine with these UK standards, you keep your site secured and ensure your digital platform meets standard cybersecurity insurance requirements. This dedication to security shows your clients that you treat consumer data protection as an absolute priority.
Summary and Final Actionable Checklist
Protecting your WordPress platform is not a one-off project. It requires an ongoing commitment to best practices that shield your site from automated threats without hurting your user experience.
Your essential technical checklist includes:
- Choosing an isolated, managed server host.
- Enforcing two-factor authentication for everyone.
- Applying file permission values of 755 and 644.
- Disabling the dashboard-level database and file editors.
- Delivering robust HTTP security headers on all responses.
- Routing traffic through a DNS proxy firewall.
- Keeping your backups off-site and automated.
- Running updates in isolated staging sandboxes first.
By implementing these layers of security, you minimize your platform’s vulnerability to hacks, ensuring your digital presence is built to scale securely.
If you want the flexibility of open-source software but do not want to manage technical security yourself, consider partnering with a specialized web development agency, like mellocity.com. Their team can design, secure, and monitor your website, ensuring your platform is fast, clean, and always ready to grow.